Recently a new Linux vulnerability has been found its called Venom Vulnerability - CVE-2015-3456. The details are documented on My Oracle Support Doc ID 2011997.1.
Details on the Venom vulnerability are as follows which is documented in in the Oracle Linux CVE URL http://linux.oracle.com/cve/CVE-2015-3456.html
"An out-of-bounds memory access flaw was found in the way QEMU's
virtual Floppy Disk Controller (FDC) handled FIFO buffer access while
processing certain FDC commands. A privileged guest user could use this
flaw to crash the guest or, potentially, execute arbitrary code on the
host with the privileges of the host's QEMU process corresponding to the
guest."
Please note The issue listed here only affects Oracle Database Machine database
servers running Oracle VM (OVM). Database servers running physical
installations (no OVM) and Exadata storage cells are not vulnerable.
The following My Oracle Support document is also very useful. It contains updated information on impacts to Oracle Exadata based on Security issues and Common Vulnerabilities and Exposures (CVE) reported against Linux. There is a complete table with all of the CVE information and a link to the Oracle Support document with the fix for the issue as well.
Responses to common Exadata security scan findings (Doc ID 1405320.1)
Thursday, May 21, 2015
Tuesday, April 14, 2015
Disk overhead Exadata X2
I had a discussion recently about the available storage from the Exadata storage cells in this case it was an X2. Please note the disks are advertised as 2TB in size however there is a small overhead at each stage from the physicaldisk layer then to the celldisk layer which I show in this posting.
From the below example we can see the physical disk size is 2TB from the makemodel property but the physicalsize is about 1862.66GB this is a drop of 185.34GB from 2048G.
CellCLI> list physicaldisk 20:0 detail
name: 20:0
deviceId: 19
diskType: HardDisk
enclosureDeviceId: 20
errMediaCount: 0
errOtherCount: 0
foreignState: false
luns: 0_0
makeModel: "SEAGATE ST32000SSSUN2.0T"
physicalFirmware: 061A
physicalInsertTime: xxxxxxxxxxxxxxxxxxx
physicalInterface: sas
physicalSerial: xxxxxxxxxxxxxxxxxxx
physicalSize: 1862.6559999994934G
slotNumber: 0
status: normal
We can see from the celldisk level the size is being reported as about 1832.59GB another drop of about 30GB.
CellCLI> list celldisk CD_00_cel01 detail
name: CD_00_cel01
comment:
creationTime: xxxxxxxxxxxxxxxxxxx
deviceName: /dev/sda
devicePartition: /dev/sda3
diskType: HardDisk
errorCount: 0
freeSpace: 0
id: xxxxxxxxxxxxxxxxxxx
interleaving: none
lun: 0_0
physicalDisk: xxxxxxxxxxxxxxxxxxx
raidLevel: 0
size: 1832.59375G
status: normal
cel01: size: 1832.59375G
cel01: size: 1832.59375G
cel01: size: 1861.703125G
cel01: size: 1861.703125G
cel01: size: 1861.703125G
cel01: size: 1861.703125G
cel01: size: 1861.703125G
cel01: size: 1861.703125G
cel01: size: 1861.703125G
cel01: size: 1861.703125G
cel01: size: 1861.703125G
cel01: size: 1861.703125G
Finally we can see with the overhead at each level starting from a 2TB physical disk down to 1832GB of usable space to be used in ASM before we add the disk to a diskgroup with a NORMAL or HIGH redundancy level which will reduce the available space even further with ASM mirroring. We get about 89.5% of usable disk storage for each 2TB disk for an overhead of 10.5% which only applies to the first and second disk for overhead in the cell storage node. The remaining celldisks have 1861.7GB disks which is small overhead of about 1GB.
One more item to note the grid disk size will match the size reported in v$asm_disk since the grid disks are presented in ASM.
CellCLI> list griddisk DATA_CD_00_cel01 detail
name: DATA_CD_00_cel01
asmDiskgroupName: DATA
asmDiskName: DATA_CD_00_CEL01
asmFailGroupName: CEL01
availableTo:
cachingPolicy: default
cellDisk: CD_00_cel01
comment:
creationTime: xxxxxxxxxxxxxxxxxxx
diskType: HardDisk
errorCount: 0
id: xxxxxxxxxxx
offset: 32M
size: 1466G
status: active
select name, TOTAL_MB/1024 from v$asm_disk ;
NAME TOTAL_MB/1024
------------------------------ -------------
...
DATA_CD_01_CEL01 1466
....
Please keep this in mind when doing sizing for diskgroups and future capacity planning in setting up your Exadata storage.
Wednesday, April 8, 2015
Automate Deleting a Database
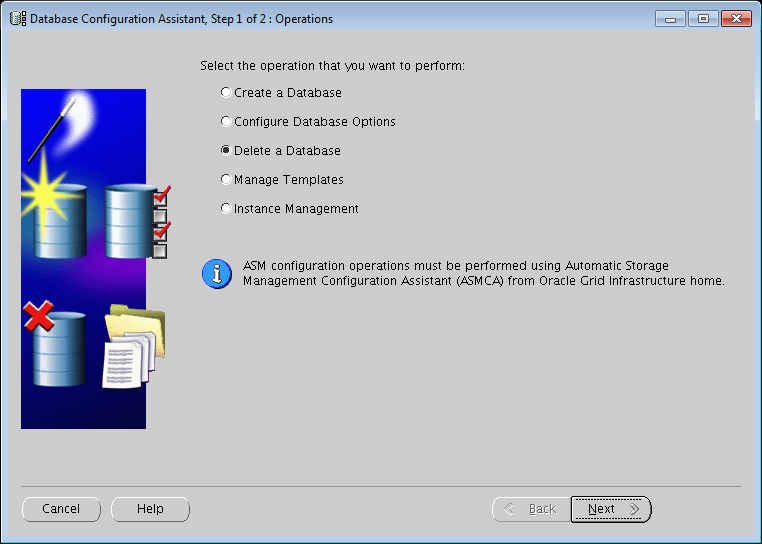
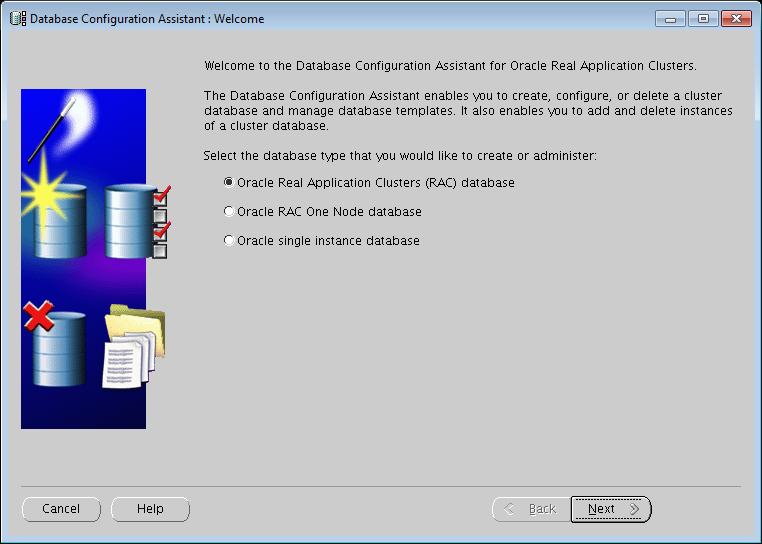
Delete a RAC database with DBCA and GUI and command line.
I wanted to demonstrate a simple way to delete or drop a RAC database using the Database Configuration Assistant. I have done this several times manually and decided to use DBCA to do this task easily which helps to automate the process and save time.
- Set the appropriate database home then invoke dbca as the oracle user from the command line.
- Select RAC database
- Select the option to Delete a Database.

- Select the database to delete then click Finish.

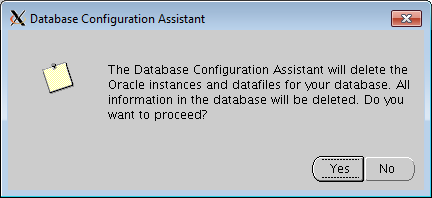
- Confirm Yes to delete all of the Oracle instances and datafiles for your database.
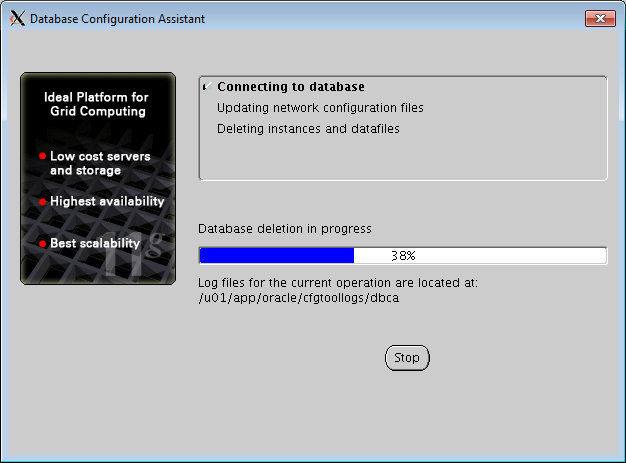
- Monitor the progress
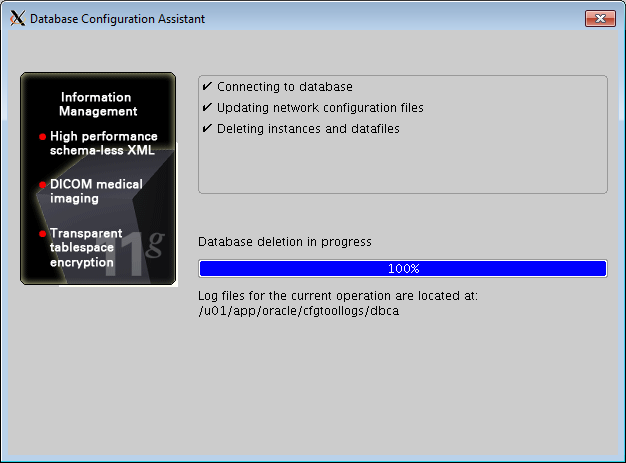
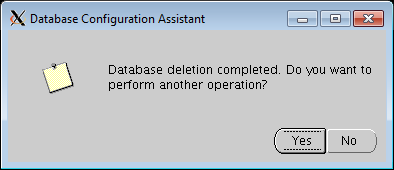
- Final confirmation screen to perform another operation.
- Also you may monitor the progress of the database deletion from the alert log, please note the alert log will be removed after the database is removed.
Wed Apr 08 10:28:07 2015
ALTER SYSTEM SET cluster_database=FALSE SCOPE=SPFILE;
Shutting down instance (immediate)
Stopping background process SMCO
Shutting down instance: further logons disabled
Stopping background process QMN
...... Summmarized output
Completed: ALTER DATABASE CLOSE NORMAL
Deleted Oracle managed file +RECO_EXAD/odsdev2/archivelog/2015_04_08/thread_1_seq_21807.49154.876479305
...... Start the database with cluster_database set to false
Completed: ALTER DATABASE MOUNT
ALTER SYSTEM enable restricted session;
DROP DATABASE
Deleted Oracle managed file +DATA_EXAD/odsdev2/datafile/system.459.791624835
Deleted Oracle managed file +DATA_EXAD/odsdev2/datafile/sysaux.457.791624821
...... Dropping of files from ASM associated with database
You will notice in ASM the directory for the database and its contents are removed as well also all RAC services registered to the Clusterware are also removed for you automatically!
Below is even an easier way to invoke dbca to drop a database via the command line.
The database must be running when you do this. Thanks to Charles Kim for sharing this with me.
RMANDR - oracle: cat del_DBATOOLS_dbca.txt
dbca -silent -deleteDatabase -sourceDB DBATOOLS -sysDBAUserName sys -sysDBAPassword ChangemeSys!
RMANDR - oracle: ksh del_DBATOOLS_dbca.txt
Connecting to database
4% complete
9% complete
14% complete
19% complete
23% complete
28% complete
47% complete
Updating network configuration files
52% complete
Deleting instance and datafiles
76% complete
100% complete
Look at the log file "/apps/oracle/cfgtoollogs/dbca/DBATOOLS.log" for further details.
Monday, February 23, 2015
Set CONTROL_FILE_RECORD_KEEP_TIME with RMAN Retention Policy
I wanted to share a guideline for setting your
CONTROL_FILE_RECORD_KEEP_TIME parameter in the Oracle database especially when
your using an RMAN retention policy. The default value for the
CONTROL_FILE_RECORD_KEEP_TIME parameter is 7 days however if for example your
taking RMAN database backups to disk and have limited space and know you can
only have about 14 days of backups you would most likely be employing the RMAN
retention policy as follows, this means keep all backups on disk that are
required to recover the database within the last 14 days. Backups that are not
needed for the 14 day recovery window will be marked as obsolete.
RMAN> CONFIGURE
RETENTION POLICY TO RECOVERY WINDOW OF 14 DAYS;
The following command can be issued within your backup
script to delete the obsolete backups.
RMAN> DELETE
NOPROMPT OBSOLETE;
or you may run the following command as well if you do not
have a recovery window defined.
RMAN> DELETE
NOPROMPT OBSOLETE RECOVERY WINDOW OF 14 DAYS;
The key thing to remember when you have an RMAN retention
policy defined is to ensure your CONTROL_FILE_RECORD_KEEP_TIME parameter
is set to be Larger than defined retention policy otherwise you risk
NOT deleting older backups and will use additional storage to keep stray backups!
If the CONTROL_FILE_RECORD_KEEP_TIME parameter is less than
the retention policy then it may overwrite reusable records prior to obsoleting
them in the RMAN metadata. Therefore it is recommended that the
CONTROL_FILE_RECORD_KEEP_TIME parameter should set to a higher value than the
retention policy.
Formula
CONTROL_FILE_RECORD_KEEP_TIME = retention period + level 0 backup interval + 1
For e.g.
e.q. level 0 backup once a week with retention policy of a recovery windows of 14 days then in this case the CONTROL_FILE_RECORD_KEEP_TIME should be 14+7+1=22
Formula
CONTROL_FILE_RECORD_KEEP_TIME = retention period + level 0 backup interval + 1
For e.g.
e.q. level 0 backup once a week with retention policy of a recovery windows of 14 days then in this case the CONTROL_FILE_RECORD_KEEP_TIME should be 14+7+1=22
This information is also documented in MOS note: Relation between RMAN retention period and control_file_record_keep_time (Doc ID 397269.1)
Thursday, January 29, 2015
Exadata Ghost Vulnerability
There is a new Oracle Linux vulnerability called Ghost documented in cve-2015-0235 this affects Oracle Exadata.
As of yet the Oracle Security and Patch patch page should be updated soon.
http://www.oracle.com/technetwork/topics/security/alerts-086861.html
The solution for Exadata is well documented in the support note below.
glibc vulnerability (CVE-2015-0235) patch availability for Oracle Exadata Database Machine (Doc ID 1965525.1)
Download and stage the files needed
For Exadata image versions 12.1.1.1.1 or earlier,
obtain updated packages using the following package versions, or later package
versions, if available:
glibc-2.5-123.0.1.el5_11.1.i686.rpm
glibc-2.5-123.0.1.el5_11.1.x86_64.rpm
glibc-common-2.5-123.0.1.el5_11.1.x86_64.rpm
glibc-devel-2.5-123.0.1.el5_11.1.i386.rpm
glibc-devel-2.5-123.0.1.el5_11.1.x86_64.rpm
glibc-headers-2.5-123.0.1.el5_11.1.x86_64.rpm
glibc-utils-2.5-123.0.1.el5_11.1.x86_64.rpm
nscd-2.5-123.0.1.el5_11.1.x86_64.rpm
These packages may be obtained from http://public-yum.oracle.com/repo/OracleLinux/OL5/latest/x86_64/.
For Exadata image version 12.1.2.1.0, obtain
updated packages using the following package versions, or later package
versions, if available:
glibc-2.12-1.149.el6_6.5.i686.rpm
glibc-2.12-1.149.el6_6.5.x86_64.rpm
glibc-common-2.12-1.149.el6_6.5.x86_64.rpm
glibc-devel-2.12-1.149.el6_6.5.i686.rpm
glibc-devel-2.12-1.149.el6_6.5.x86_64.rpm
glibc-headers-2.12-1.149.el6_6.5.x86_64.rpm
nscd-2.12-1.149.el6_6.5.x86_64.rpm
These packages may be obtained from http://public-yum.oracle.com/repo/OracleLinux/OL6/latest/x86_64/.
Oracle Exadata Database Servers running Linux
To install these packages on database servers,
follow the steps below (applicable to all Exadata image versions). These may be
done in parallel on all database servers or in a rolling manner. It is intended
that the package installation is followed by a system reboot in a relatively
short time (i.e. minutes, not days). Since the system will be rebooted, you may
choose to stop the database and cluster processes on the node being updated in
advance or allow the reboot process to stop them for you.
1. Capture
the currently installed rpm versions (including package architectures) using
the following command and save the output in a file in case a rollback is
needed later.
1.
rpm -qa
--queryformat="%{name}-%{version}-%{release}.%{arch}\n" | egrep
'glibc|nscd'
2. Stage the
files on each database server in /tmp/glibc-update as root
1.
mkdir /tmp/glibc-update
2.
Place all the rpms listed above (for your
appropriate release) in the directory /tmp/glibc-update
3. If using
Exadata Database Server image version 11.2.3.3.0 or later, run this command
1.
rpm -e exadata-sun-computenode-exact
4. For all
releases: install the updated rpms using this command
1.
rpm -Fvh /tmp/glibc-update/*rpm
5. If the
installation is successful (no errors), reboot the system using
1.
shutdown -r -y now
6. After the
reboot, ensure the system is up and running and the cluster processes have
restarted. Remove the staged files, if desired
1.
rm -rf /tmp/glibc-update
If a rollback is required, it should be done with
Oracle Support guidance via an SR. The information gathered in step 1 above
should be provided to the SR.
Note that it is not necessary to relink any
binaries after this update.
Oracle Exadata Database Servers running Solaris
Solaris systems do not include glibc.
Oracle Exadata Storage Cells
For storage cells, obtain the same files listed
above for database servers and follow these steps for installation on the
storage cells. While storage cells are not normally permitted to have OS
updates applied, this procedure is allowed as an exception to address this
vulnerability only.
To install these updates, the storage cell will
need to be rebooted. This can be done in a rolling manner in order to minimize
availability impact to the system. Before attempting the installation
procedures below, it is recommended to review Note 1188080.1 for procedures to gracefully
take a storage cell offline before rebooting it and then bringing it back
online after the reboot.
If desired, all cells can be done in parallel as
long as the cluster is shutdown before rebooting the cells.
Note: Do not remove the exadata-sun-cellnode-exact
package on storage cells.
To install these packages on storage cells, follow
the steps below (applicable to all Exadata image versions).
1. Capture
the currently installed rpm versions (including package architectures) using
the following command and save the output in a file in case a rollback is
needed later.
1.
rpm -qa
--queryformat="%{name}-%{version}-%{release}.%{arch}\n" | egrep
'glibc|nscd'
2. Stage the
files on each storage cell in /tmp/glibc-update as root
1.
mkdir /tmp/glibc-update
2.
Place all the rpms listed above (for your
appropriate release) in the directory /tmp/glibc-update
3. Install
the updated rpms using this command
1.
rpm -Fvh --nodeps /tmp/glibc-update/*rpm
4. If the
installation is successful (no errors), reboot the system using
1.
shutdown -r -y now
5. After the
reboot, ensure the system is up and running. Remove the staged files, if
desired
1.
rm -rf /tmp/glibc-update
6. Follow
the steps from Note 1188080.1 to ensure the cell is fully
online again before proceeding to the next storage cell.
If a rollback is
required, it should be done with Oracle Support guidance via an SR. The
information gathered in step 1 above should be provided to the SR.
Thursday, January 15, 2015
Awarded Oracle ACE Associate!
Its official I would like to sincerely thank Tim Gorman for nominating me to receive the Oracle ACE Associate award! I am honored to be part of the Oracle ACE community
Nabil Nawaz Oracle ACE profile
Nabil Nawaz Oracle ACE profile
OEM 12c Cloud Control Reset the Weblogic and Nodemanager password
Have you ever encountered a situation where you lost the nodemanager and weblogic password for your Oracle Enterprise Manager OEM12c environment? It is quite common especially if you start to support a new environment and the DBA may only know the sysman password but not the others and you may need these account passwords once you decide to patch OEM12c.
Please refer to this useful Oracle Support note that has detailed steps to do this.
These steps are detailed and long, please ensure you follow them carefully otherwise you may have issues in starting your OMS again.
12c Cloud Control: Steps for Modifying the Password for Weblogic and Nodemanager User Accounts in the Enterprise Manager Installation (Doc ID 1450798.1)
*****************************************************************************************************************
Changing the Weblogic Password When Existing Password is Unknown
1. Stop the OMS, Agent on the OMS machine and set the necessary environment variables:
Stop the OMS:
$ cd <OMS_HOME>/bin
$ emctl stop oms -all
Ensure the OMS has stopped completely and there is no java process running from OMS base location:
$ ps -ef | grep java
If any processes are listed, then kill them using: kill -9 <pid> command, after ensuring that the process is running from the OMS base installation.
Stop the Agent on the OMS machine:
$ cd <AGENT_HOME>/bin>
$ emctl stop agent
Set the necessary environment variables for the WLS domain:
$ export DOMAIN_HOME=<EM_INSTANCE_BASE>/user_projects/domains/GCDomain/bin
$ . ./setDomainEnv.sh
Note that you need to replace <EM_INSTANCE_BASE> with the full path to the gc_inst directory.
Note: In case of a multi-OMS setup, all the OMS and the corresponding monitoring agent must be stopped.
2. Rename the existing DefaultAuthenticatorInit.ldift file in the domain directory and create a new file:
$ cd $DOMAIN_HOME/security
$ mv DefaultAuthenticatorInit.ldift DefaultAuthenticatorInit.ldift_old
$ java weblogic.security.utils.AdminAccount weblogic <new_password> .
Note:
- Replace <new_password> with the new password that you wish to set for the weblogic user.
- The character '.' is mandatory at the end of above command.
- In case of a multi-OMS setup, the above step need to be performed on each OMS server and ensure that the same password is provided for the weblogic user on all the OMS machines.
3. Rename the ldap directory for the AdminServer and Managed Server:
$ cd $DOMAIN_HOME/servers/EMGC_ADMINSERVER/data
$ mv ldap ldap_old
$ cd $DOMAIN_HOME/servers/EMGC_OMS1/data
$ mv ldap ldap_old
In case of a multi-OMS setup, the ldap directory needs to be renamed only for the managed server
4. Rename the .lok file in tmp directory of Admin Server and Managed Server, if it exists:
$ cd $DOMAIN_HOME/servers/EMGC_ADMINSERVER/tmp
$ mv EMGC_ADMINSERVER.lok EMGC_ADMINSERVER.lok_old
$ cd $DOMAIN_HOME/servers/EMGC_OMS1/tmp
$ mv EMGC_OMS1.lok EMGC_OMS1.lok_old
In case of a multi-OMS setup, the tmp/*.lok file needs to be renamed only for the managed server.
5. Edit the Admin Server's $DOMAIN_HOME/servers/EMGC_ADMINSERVER/security/boot.properties file and specify the new password entered in step 2 in clear text, for the password field:
password=<new_password_in_clear_text>
username={AES}g6mxfhlx/JtaVKgqx9/pYb8bWaxitVXzbLMzwo9tOIs\=
For example:
password=oracle123
username={AES}g6mxfhlx/JtaVKgqx9/pYb8bWaxitVXzbLMzwo9tOIs\=
6. Modify the Managed Server's $DOMAIN_HOME/servers/EMGC_OMS1/data/nodemanager/boot.properties and specify the new password entered in step 2 in clear text, for the password field:
TrustKeyStore=DemoTrust
password=<new_password_in_clear_text>
username={AES}g6mxfhlx/JtaVKgqx9/pYb8bWaxitVXzbLMzwo9tOIs\=
For example:
TrustKeyStore=DemoTrust
password=oracle123
username={AES}g6mxfhlx/JtaVKgqx9/pYb8bWaxitVXzbLMzwo9tOIs\=
In case of a multi-OMS setup, the above step need to be performed on each OMS server.
7. As part of the 12c OMS installation, two weblogic users named: OracleSystemUser and weblogic_mntr are created. When the weblogic password is modified manually, these users are removed and it is important that these users are re-created manually by following the below steps:
In a terminal session, start the Admin server:
$ $DOMAIN_HOME/startWebLogic.sh
Wait till the status of Admin server is reported as 'RUNNING'. This session should be kept open till the below steps are completed.
Access the Admin Server Console using the URL: https://<omsmachine.domain>:<port>/console
(Default admin server console port is 7101). For the exact URL, refer to the details in the <OMS_HOME>/install/setupinfo.txt file.
Login with the weblogic user and provide the new password that was entered in Step 2.
In the Admin Server Console, navigate to Security Realms -> myrealm -> Users and Groups -> Groups.
Click on the 'New' button and enter the below details:
Name: OracleSystemGroup
Description: Oracle application software system group
Provider: <leave the default value: DefaultAuthenticator>
Click OK
Navigate to Security Realms -> myrealm -> Users and Groups -> Users. Click on the 'New' button and enter:
User: OracleSystemUser
Description: Oracle application software system user
Password: <provide same password as weblogic user>
Click OK.
Click on the username 'OracleSystemUser' and then click on 'Groups'. Select the previously created 'OracleSystemGroup' and click 'Save'.
In the Security Realms -> myrealm -> Users and Groups -> Users, click on the 'New' button again and enter:
User: weblogic_mntr
Description: Oracle application weblogic mntr user
Password: <provide same password as weblogic user>
Click OK.
Click on the username 'weblogic_mntr' and then click on 'Groups'. Select 'Administrators' and click 'Save'.
If the Admin Server Username specified during OEM installation is other than 'weblogic' (AS_USERNAME in emgc.properties) , then need to create a user with that username also and assign 'Administrator' group to it.
The password for nodemanager is needed in the the next step 9 when the new weblogic password is saved in the credential store. If the password for nodemanager account is also not known, then set a new password using the steps in the section: Changing the Nodemanager Password, at the end of this document and then continue with the steps below.
Navigate to GCDomain -> Security -> Embedded LDAP page, choose the 'Lock and Edit' option and select the flag 'Refresh Replica At Startup'.
Click 'Save' and then click on 'Activate Changes'.
Note: This step is needed to ensure that the LDAP data for the managed servers gets properly synchronized on startup.
Stop the Admin server by executing 'Ctrl+c' in the terminal session from which the Admin server was started at the beginning of this step.
9. Run the below command to save the new password to the EM Credential store:
cd <OMS_ORACLE_HOME>/bin
emctl secure create_admin_creds_wallet -admin_pwd <weblogic_pwd> -nodemgr_pwd <node_manager_pwd>
In case of multi-OMS setup the above step needs to be performed on each OMS server.
10. Start the OMS:
cd <OMS_HOME>/bin
emctl start oms
11. Login to Admin server console with username weblogic and the new password. Navigate to GCDomain -> Security -> Embedded LDAP page. Toggle the 'Lock and Edit option and unset the flag 'Refresh Replica At Startup'.
Click 'Save' and then click on 'Activate Changes'.
Note: The flag was used only for synchronizing the LDAP data in the managed servers at the time of startup after the password change but once this is accomplished, the option needs to be turned off as it imposes a cost on the startup operation.
12. Restart the OMS
cd <OMS_ORACLE_HOME>/bin
emctl stop oms -all
emctl start oms
13. EMGC_GCDomain is a monitored target in Enterprise Manager and the monitoring credentials of this target needs to be updated so as to continue monitoring this target:
Start the Agent on OMS Host
cd <AGENT_HOME>/bin
emctl start agent
Execute the below command to update the new password in monitoring configuration of weblogic target:
cd <OMS_HOME>/bin
emcli login -username=sysman
emcli modify_target -name="/EMGC_GCDomain/GCDomain" -type="weblogic_domain" -credentials="UserName:weblogic_mntr;password:<new password set in the admin server console>;" -on_agent
Note:
- You need to provide the user name as weblogic_mntr and its corresponding password as set in the Admin server console.
- The Monitoring password should be updated only after starting the Agent.
Back to Top
*****************************************************************************************************************
Changing the Weblogic Password When Existing Password is known
1. Access the Admin server console with the URL https://<omsmachine.domain>:<port>/console
(Default admin server console port is 7101). For the exact URL, refer to the details in the <OMS_HOME>/install/setupinfo.txt file.
2. Login to Admin server console as user weblogic and provide its password.
3. Navigate to Security Realms->myrealm->Users and Groups->choose weblogic->Passwords
weblogic_pwd
Provide the new password and save it.
5. The password for nodemanager is needed in the the below step 11 when the new weblogic password is saved in the credential store. If the password for nodemanager account also needs to be changed, then set a new password using the steps in the section: Changing the Nodemanager Password, at the end of this document and then continue with the steps below.
6. Click on 'Activate Changes' in the left panel.
7. Stop the OMS:
cd <OMS_HOME>/bin
emctl stop oms -all
8. Stop the Agent on OMS Host
cd <AGENT_HOME>/bin
emctl stop agent
9. Edit the Admin Server's $DOMAIN_HOME/servers/EMGC_ADMINSERVER/security/boot.properties file and specify the new password entered in the Admin server console in clear text, for the password field:
password=<new_password_in_clear_text>
username={AES}g6mxfhlx/JtaVKgqx9/pYb8bWaxitVXzbLMzwo9tOIs\=
For example:
password=oracle123
username={AES}g6mxfhlx/JtaVKgqx9/pYb8bWaxitVXzbLMzwo9tOIs\=
10. Modify the Managed Server's $DOMAIN_HOME/servers/EMGC_OMS1/data/nodemanager/boot.properties and specify the new password entered in step 2 in clear text, for the password field:
TrustKeyStore=DemoTrust
password=<new_password_in_clear_text>
username={AES}g6mxfhlx/JtaVKgqx9/pYb8bWaxitVXzbLMzwo9tOIs\=
For example:
TrustKeyStore=DemoTrust
password=oracle123
username={AES}g6mxfhlx/JtaVKgqx9/pYb8bWaxitVXzbLMzwo9tOIs\=
In case of a multi-OMS setup, the above step need to be performed on each OMS server.
11. Execute the below command to save the new passwords to the EM Credential store:
cd <OMS_ORACLE_HOME>/bin
emctl secure create_admin_creds_wallet -admin_pwd <weblogic_pwd> -nodemgr_pwd <node_manager_pwd>
In case of multi-OMS setup the above step needs to be performed on each OMS server.
12. Start the OMS:
cd <OMS_HOME>/bin
emctl start oms
13. EMGC_GCDomain is a monitored target in Enterprise Manager and the monitoring credentials of this target needs to be updated so as to continue monitoring this target:
Start the Agent on OMS Host
cd <AGENT_HOME>/bin
emctl start agent
Execute the below command to update the new password in monitoring configuration of weblogic target:
cd <OMS_HOME>/bin
emcli login -username=sysman
emcli modify_target -name="/EMGC_GCDomain/GCDomain" -type="weblogic_domain" -credentials="UserName:weblogic_mntr;password:<new password set in the admin server console>;" -on_agent
Note:
- You need to provide the user name as weblogic_mntr and its corresponding password as set in the Admin server console.
- The Monitoring password should be updated only after starting the Agent.
Back to Top
*********************************************************************************
Changing the Nodemanager Password
The nodemanager password can be modified by logging into the Admin server console as the weblogic user. If the password for the weblogic user is unknown, then follow the steps in the section: Changing the Weblogic Password When Existing Password is Unknown
1. Access the Admin Server Console using the URL: https://<omsmachine.domain>:<port>/console
(Default admin server console port is 7101). For the exact URL, refer to the details in the <OMS_HOME>/install/setupinfo.txt file.
2. Login with the weblogic user and navigate to GCDomain->Security-> expand the Advanced section:
nm_password
Enter the new password in the 'NodeManager Password' and 'Confirm NodeManager Password' fields and click on 'save' button. Click on 'Activate Changes' in the left panel.
NM_PASSWORD_2
3. On the OMS machine, edit the nm_password.properties file under <EM_INSTANCE_BASE/user_projects/domains/GCDomain/config/nodemanager and modify:
hashed=y4x2gnOpFlH9x9HUatIOVlV7nnU\=
TO
password=<new_nodemanager_password>
username=nodemanager
Provide the new password for the nodemanager in cleartext.Ensure there is no 'space' character at the end of each line.
In case of multi-OMS setup the above step needs to be performed on each OMS server.
4.If you are only changing the nodemanager password and not weblogic password, then execute the below commands to save the new passwords to the EM Credential store.If weblogic password is also being changed, then skip this and continue with the rest of steps for changing the weblogic password :
cd <OMS_ORACLE_HOME>/bin
emctl secure create_admin_creds_wallet -admin_pwd <weblogic_pwd> -nodemgr_pwd <node_manager_pwd>
Restart OMS
<OMS_HOME>/bin>./emctl stop oms -all
<OMS_HOME>/bin>./emctl start oms
In case of multi-OMS setup the above step needs to be performed on each OMS server.
Subscribe to:
Posts (Atom)